GymBody user guide

Everything you need to run your gym on GymBody, one step at a time. The red numbers in each picture match the steps below it.

Getting started

Create your gym account

For:Owner

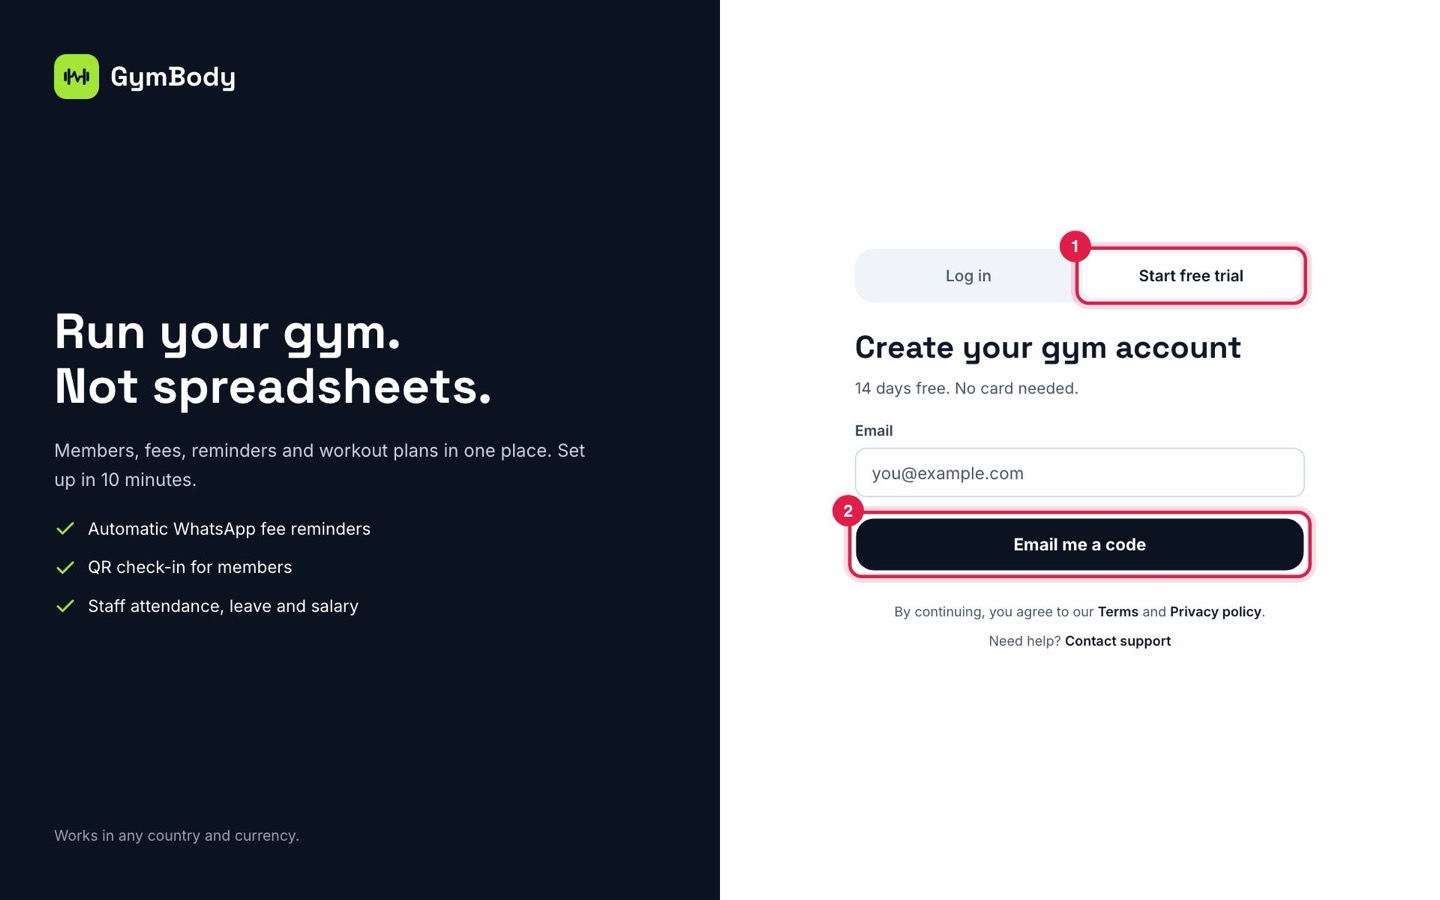
You need only an email address. There is no password: each time you log in, GymBody emails you a 6-digit code.

The sign-up screen with Start free trial and Email me a code marked

Steps

  1. 1Go to getgymbody.com and click “Start free trial” 1.
  2. 2Type your email address and click “Email me a code” 2.
  3. 3Open the email from GymBody, type the 6-digit code and continue.
  4. 4Fill in your gym's name, country, currency and phone number. Your 14-day free trial starts at once.

Good to know

  • No email? Check the Spam folder. The code works for 10 minutes; ask for a new one if it expires.
  • Staff and trainers do not sign up themselves: you add them to your team (see “Add your team”).

Find your way around

For:OwnerFront desk

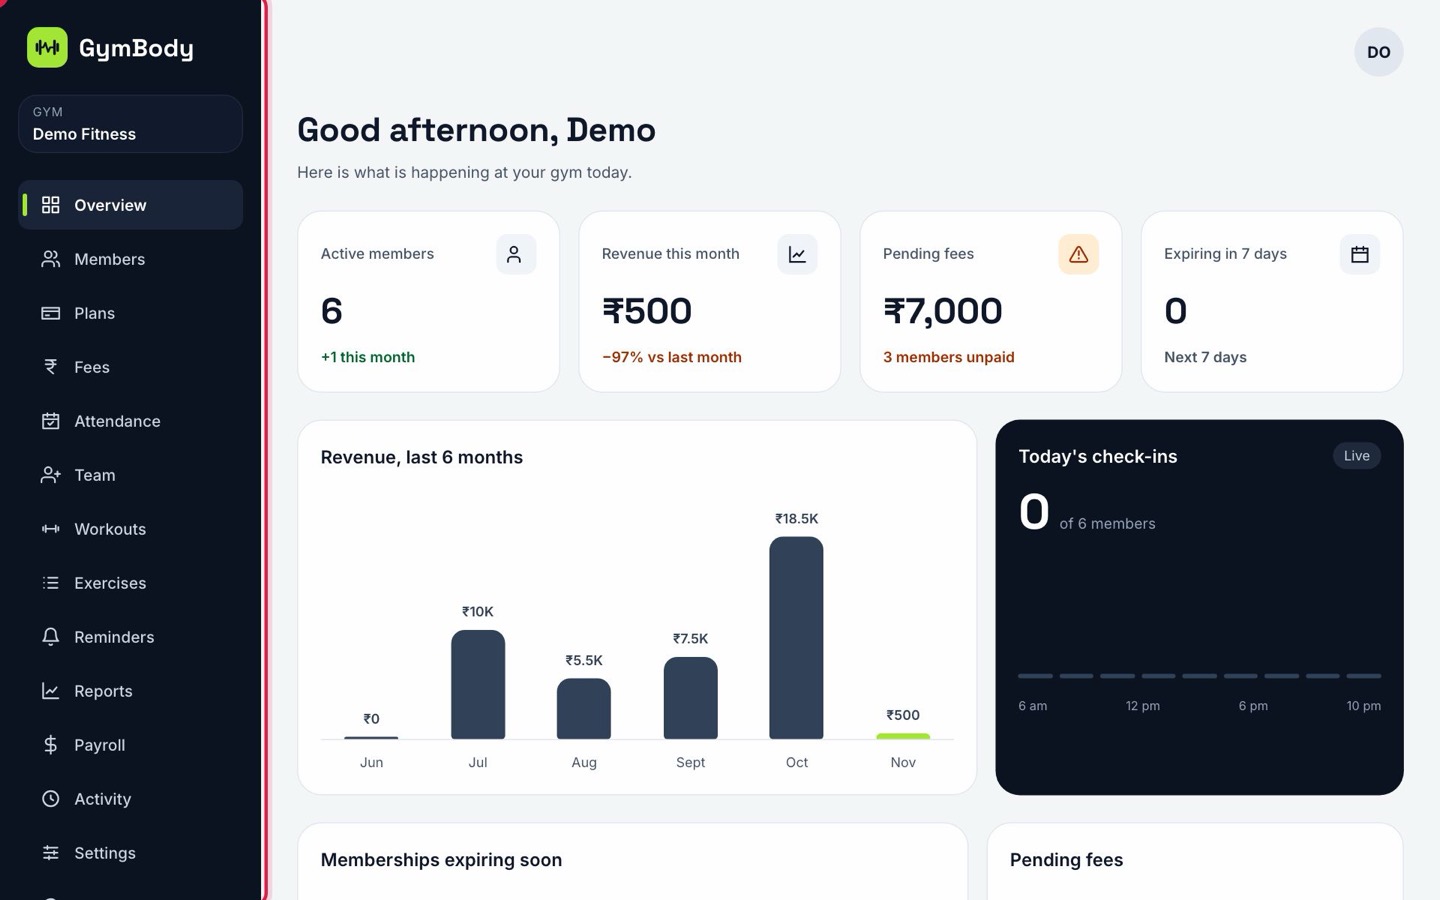
The Overview page shows today's numbers: active members, money collected this month, fees still due and memberships ending soon.

The overview dashboard with the menu marked

Steps

  1. 1Use the menu on the left 1 to open each part: Members, Plans, Fees, Attendance, Team, Workouts and more.
  2. 2On a phone, tap the ☰ button at the top left to open the same menu.
  3. 3Click any number card to open the full list behind it.

Good to know

  • Each person sees only the parts their role allows. The owner sees everything.

Members

Create your membership plans

For:Owner

Plans are the memberships you sell, such as Monthly, Quarterly and Annual. Set them up once before adding members.
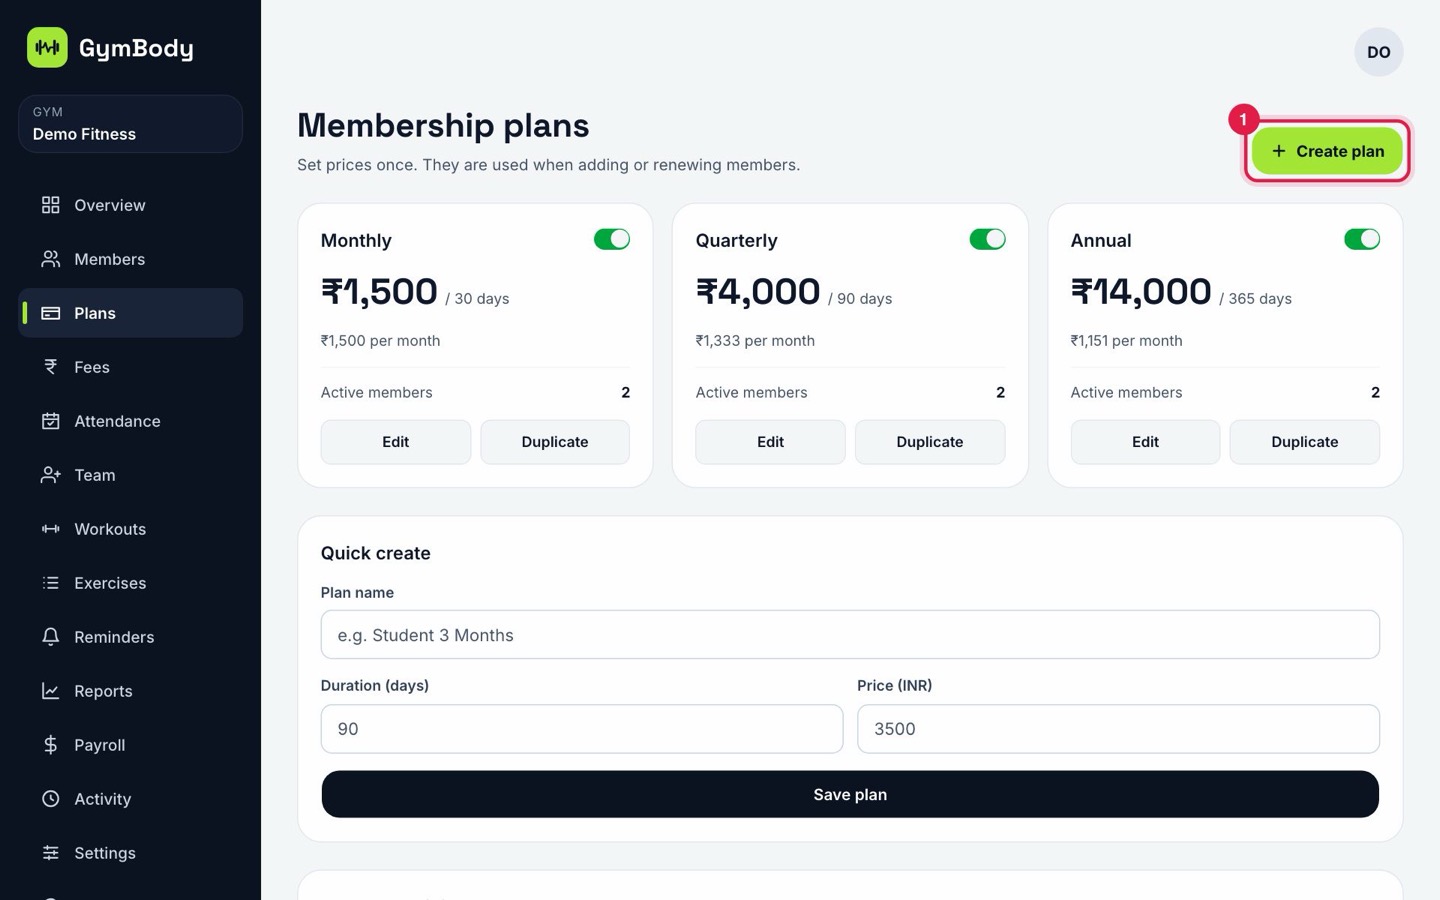
The membership plans page with Create plan marked

Steps

  1. 1Open “Plans” from the menu and click “Create plan” 1.
  2. 2Enter the name, how many days it lasts and the price, then save.
  3. 3Use the switch on a plan to stop selling it without affecting members already on it.

Good to know

  • Changing a plan's price only affects new and renewed memberships, never ones already paid.

Add members, or bring them from Excel

For:OwnerFront desk

The Members page lists everyone, with their plan, end date and fees. Filter by active, expiring, expired or unpaid.
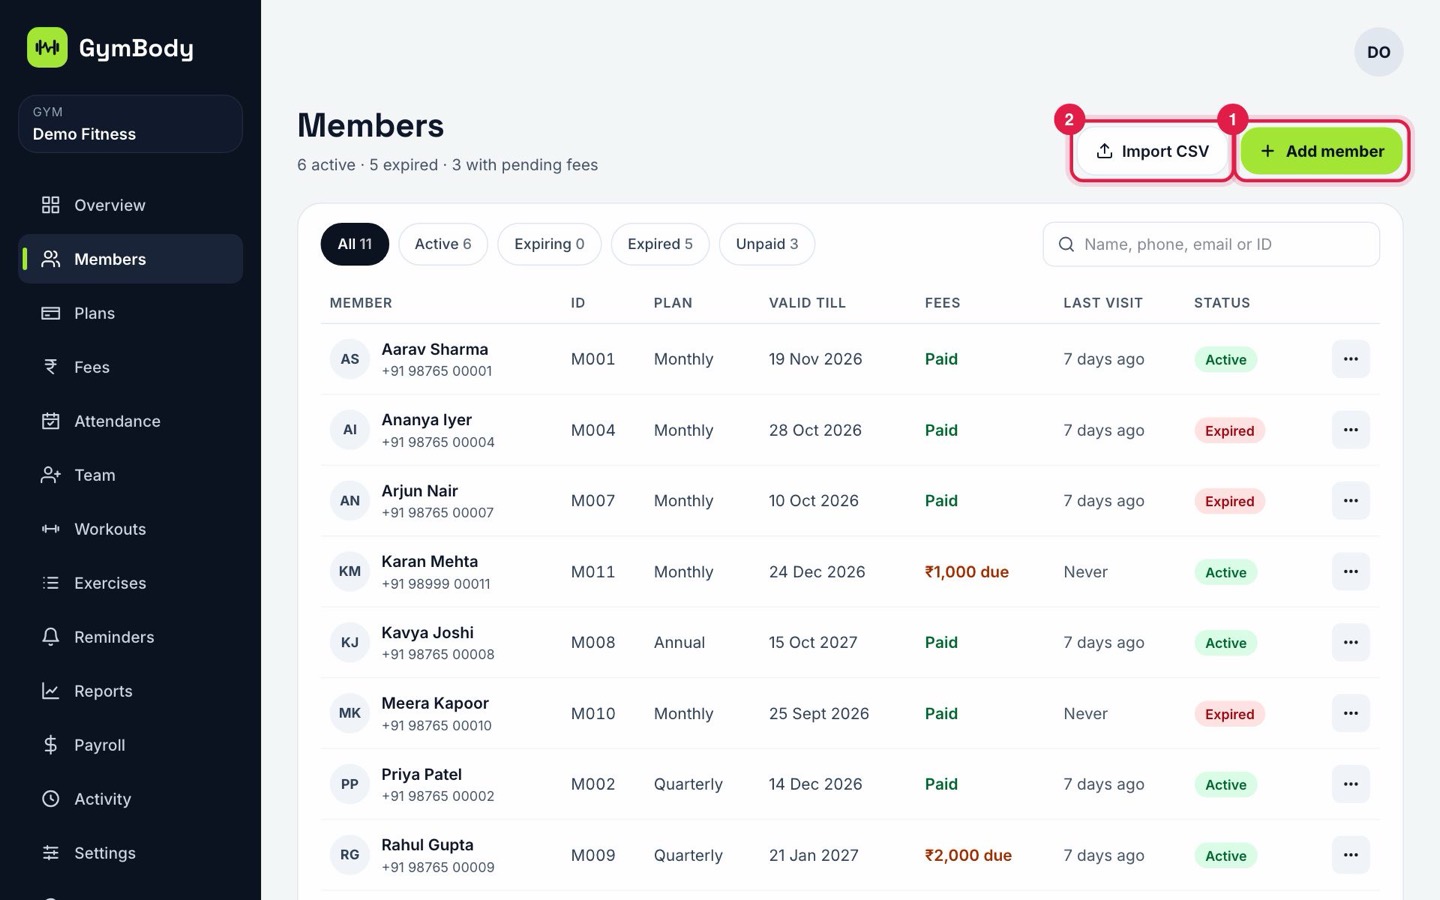
The members list with Add member and Import CSV marked

Steps

  1. 1Click “Add member” 1 to add one person (see the next section).
  2. 2Already have a list? Click “Import CSV” 2 and upload your Excel sheet saved as CSV. GymBody shows a preview before anything is saved.
  3. 3Click a member's name to open their profile.

Good to know

  • Search by name, phone, email or member ID with the search box.

Add a member, step by step

For:OwnerFront desk

Adding a member takes under a minute. The email is important: members use it to log in to the app.
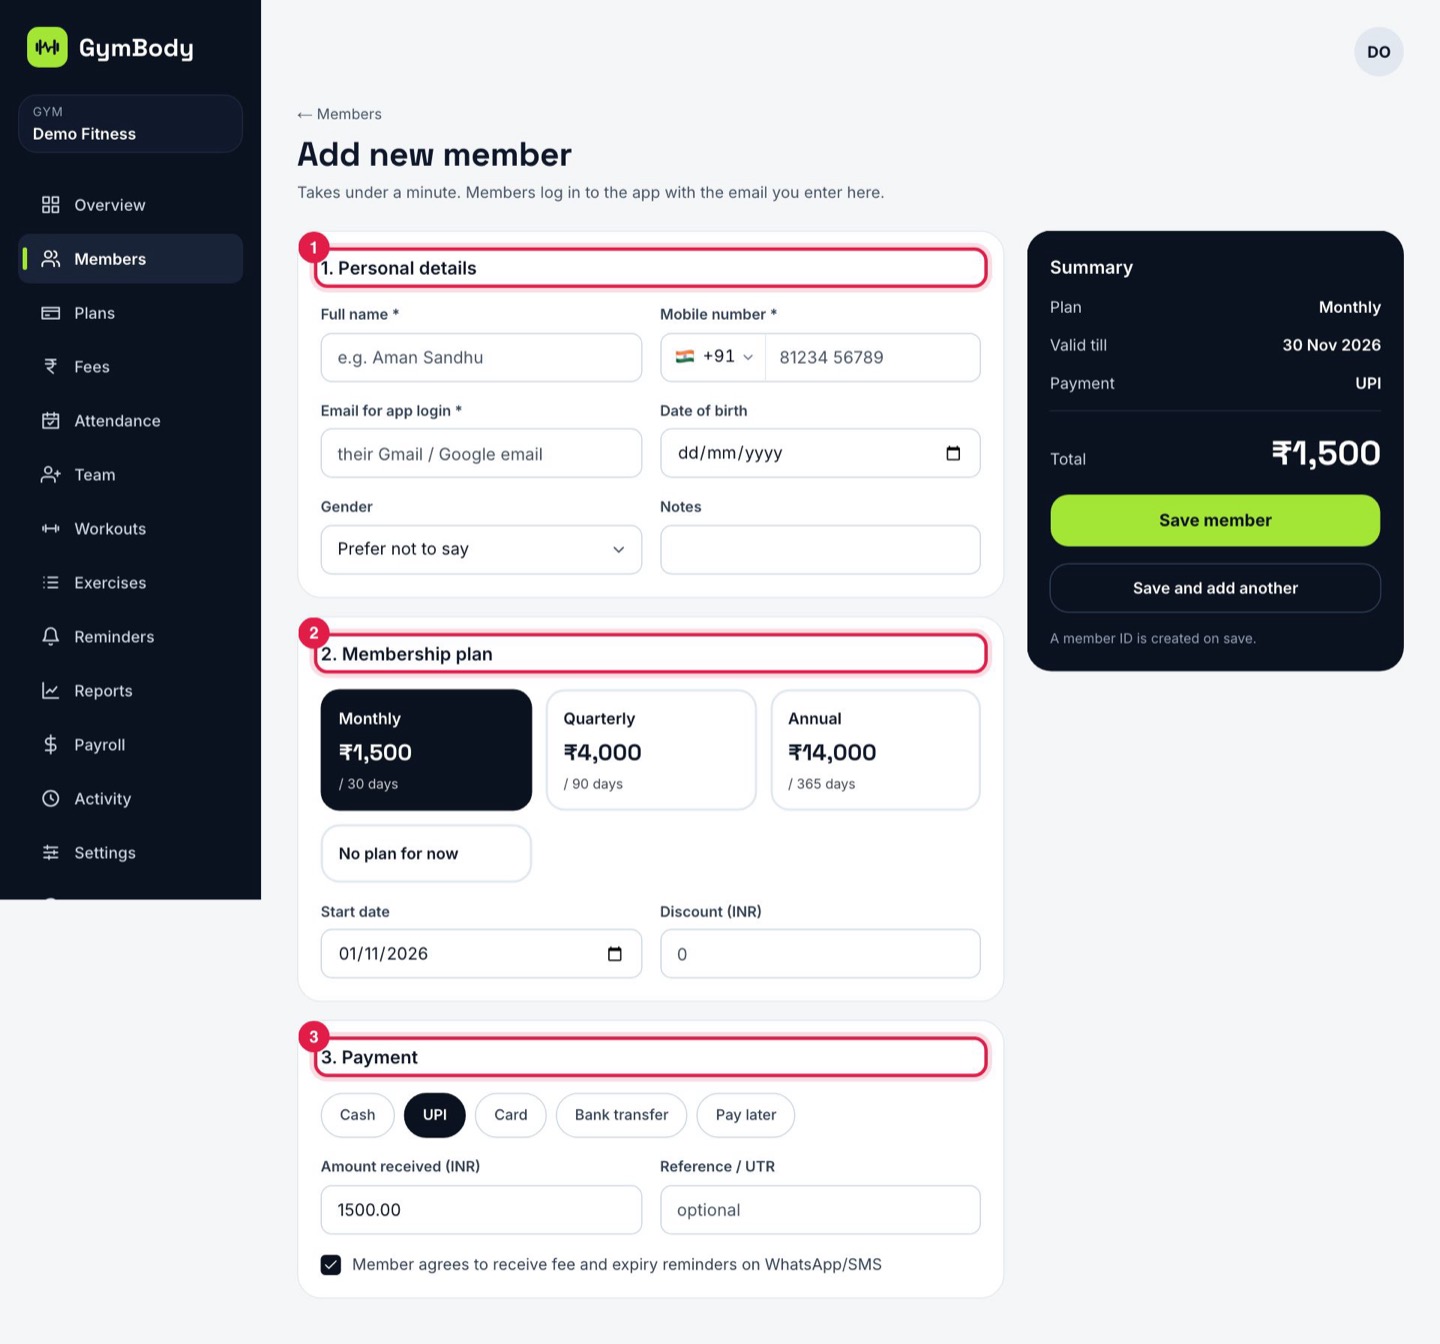
The add member form with its three parts marked

Steps

  1. 1Personal details 1: full name, mobile number and email. Date of birth, gender and notes are optional.
  2. 2Membership plan 2: pick a plan (or “No plan for now”), the start date and any discount.
  3. 3Payment 3: choose how they paid (Cash, UPI, Card, Bank transfer or Pay later) and the amount received.
  4. 4Check the summary on the right and click “Save member”. A receipt is sent to the member.

Good to know

  • “Pay later” saves the membership with the fee due; it shows under Fees → Pending.
  • Use “Save and add another” when adding several people at the desk.

Renew, take a payment or message a member

For:OwnerFront desk

A member's profile shows their membership, days left, fees, attendance, workout and trainer.
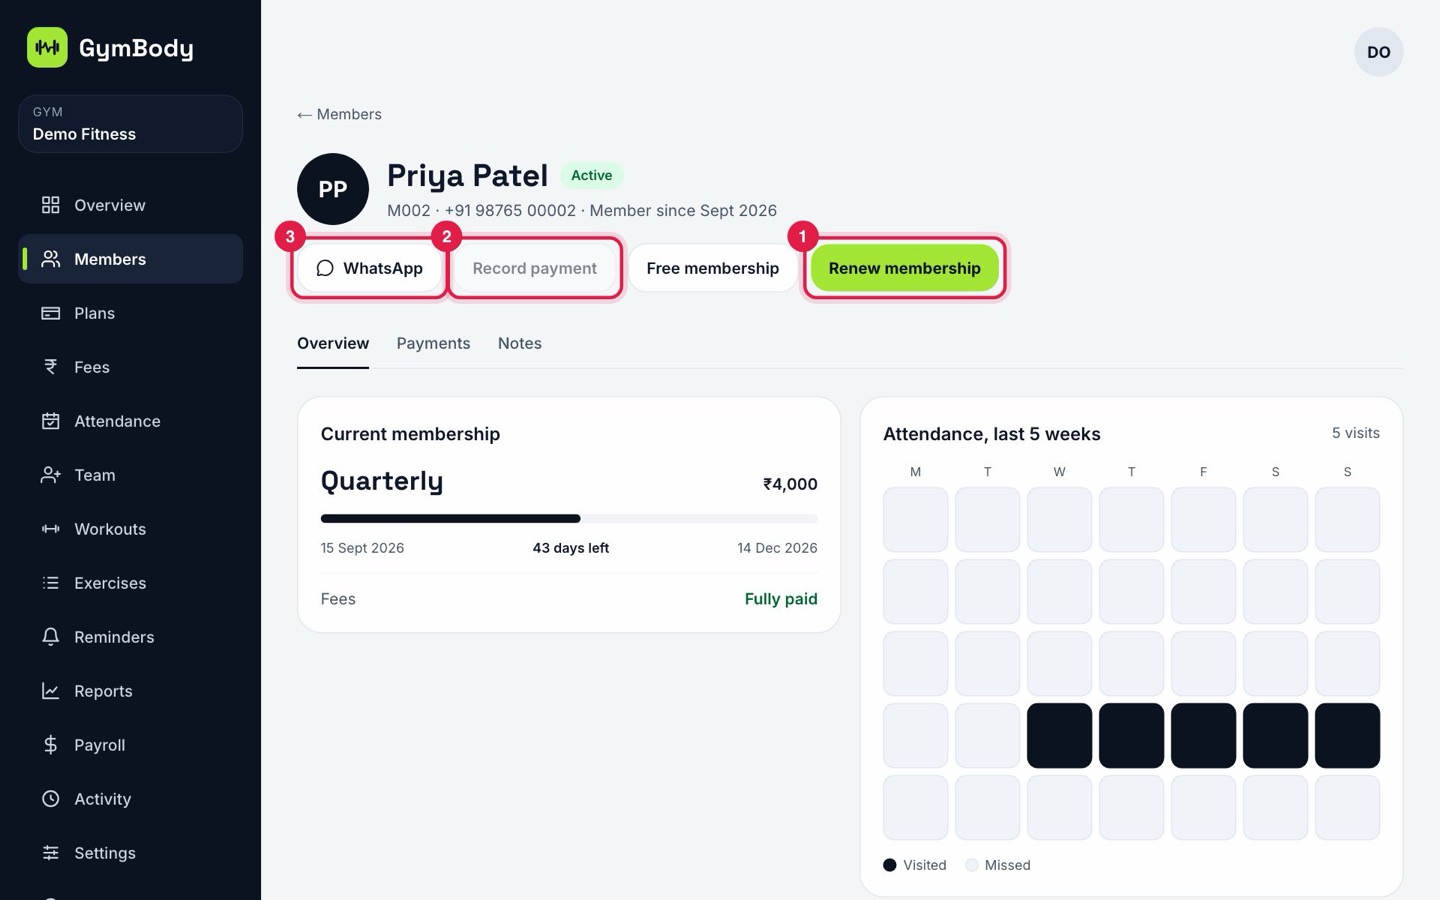
A member's profile with Renew, Record payment and WhatsApp marked

Steps

  1. 1“Renew membership” 1: starts the next membership the day after the current one ends.
  2. 2“Record payment” 2: take money for a fee that is still due.
  3. 3“WhatsApp” 3: opens WhatsApp with the member's number to send a message.

Good to know

  • “Free membership” gives a membership without a fee, for example for staff or a trial week.
  • The Payments tab lists every receipt; the Notes tab is for anything you want to remember.

Money

Take fees and follow up dues

For:OwnerFront desk

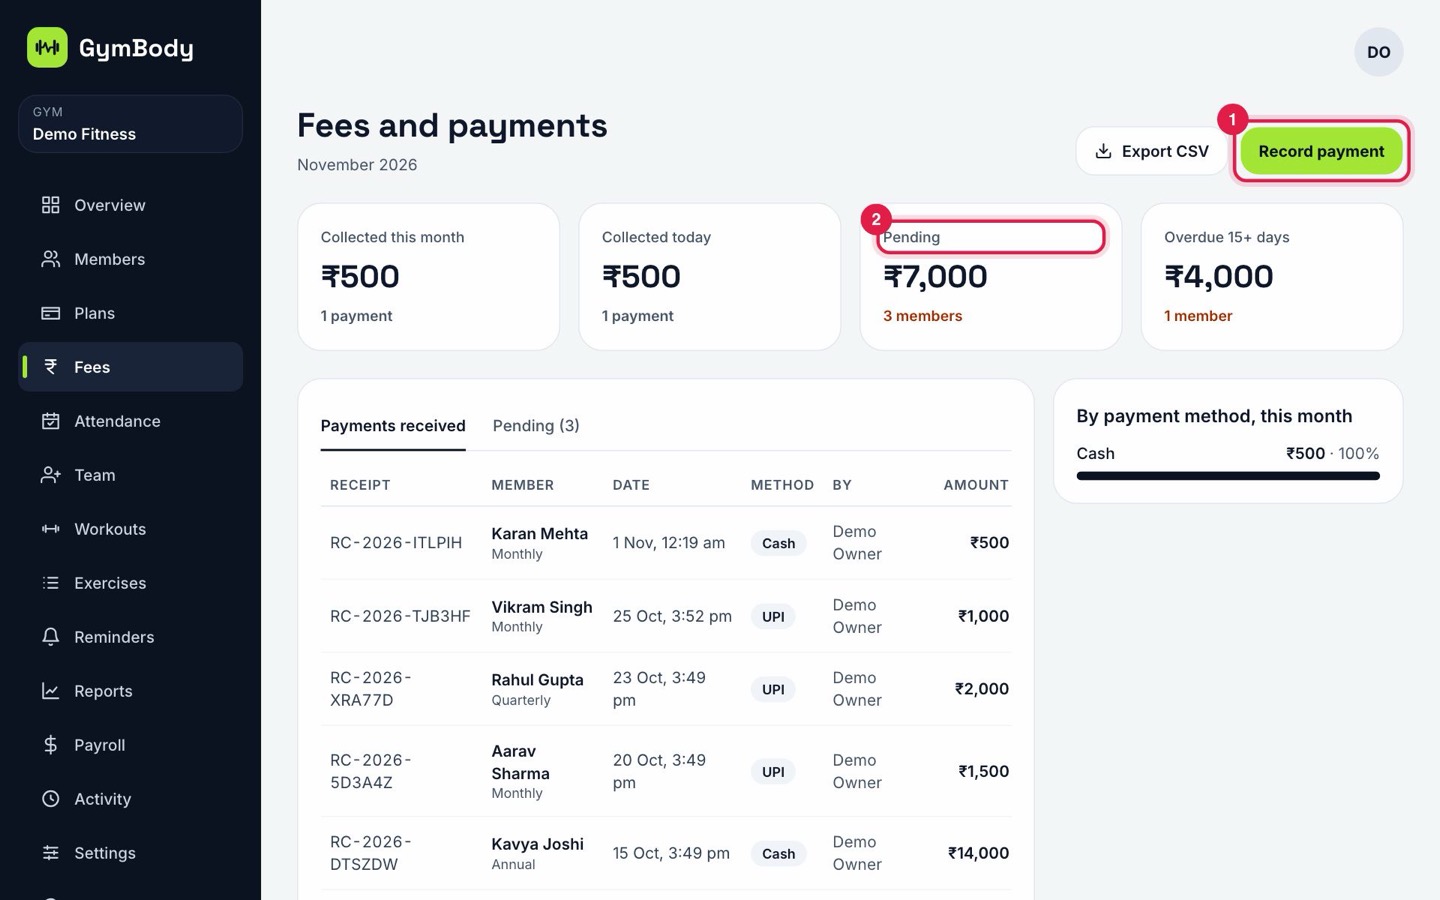
The Fees page shows what came in this month and today, what is still pending and what is overdue.

The fees page with Record payment and Pending marked

Steps

  1. 1Click “Record payment” 1 to take a fee: pick the member, the amount and how they paid.
  2. 2Open “Pending” 2 to see who still owes money and how much.
  3. 3Each payment gets a receipt number; the member gets the receipt by email (and WhatsApp when connected).

Good to know

  • Use “Export CSV” at the top to give your accountant the month's payments.

Reminders and messages

For:Owner

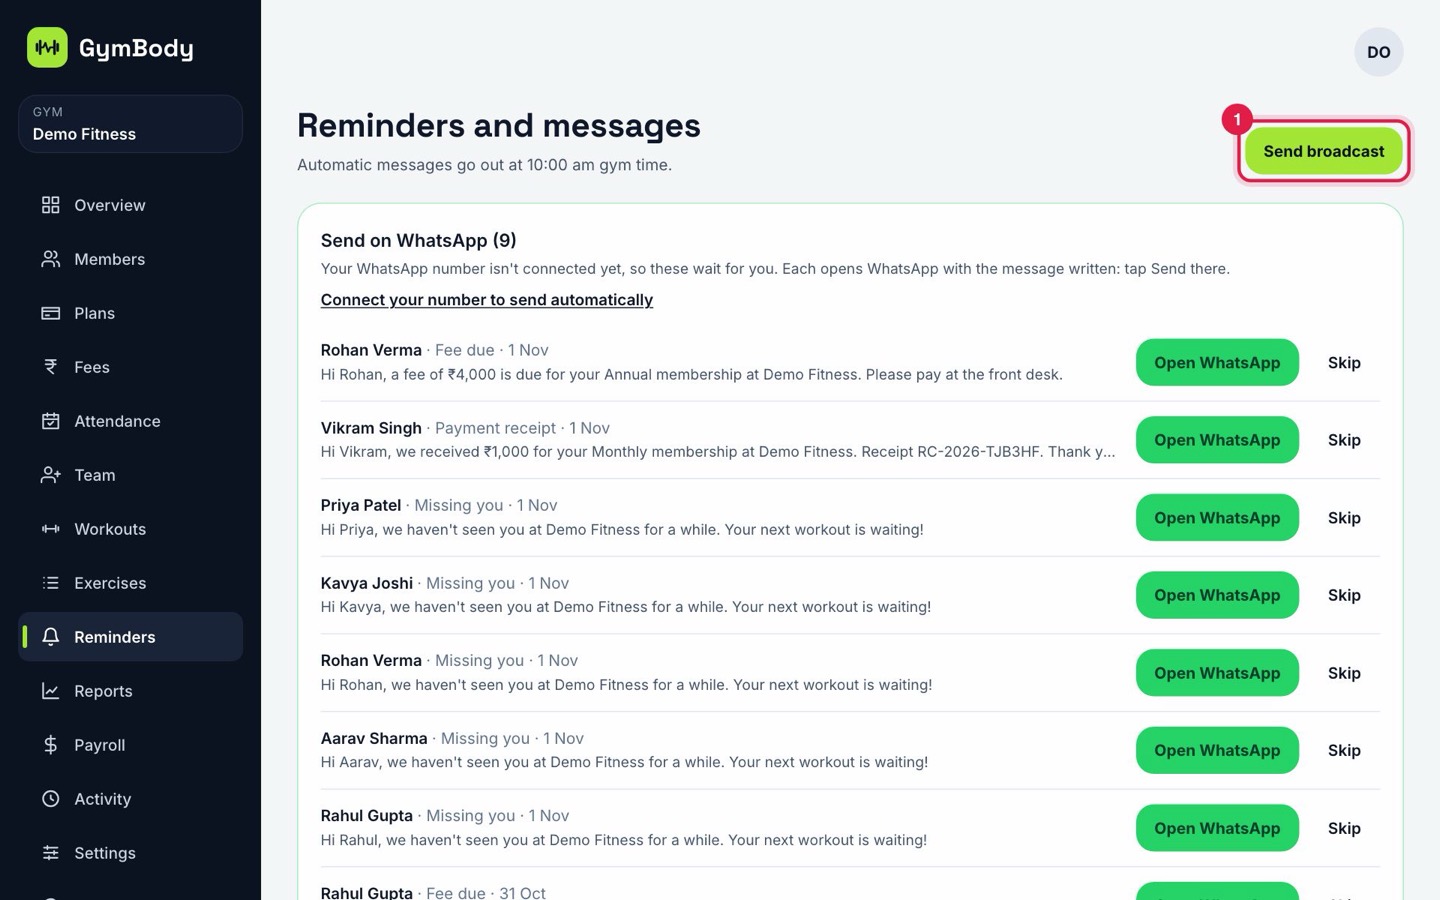
GymBody writes reminders for you: fee due, membership ending, missing for a week, payment receipts. They go out at 10:00 am gym time.

The reminders page with Send broadcast marked

Steps

  1. 1Until your WhatsApp number is connected, reminders wait in the “Send on WhatsApp” list. Click “Open WhatsApp” on each one and tap Send in WhatsApp.
  2. 2Click “Send broadcast” 1 to send one message to many members, such as a holiday notice.
  3. 3To send automatically, connect your number in Settings → WhatsApp.

Good to know

  • Email reminders go out by themselves for members who have an email.

Attendance

Member check-in with the QR code

For:OwnerFront desk

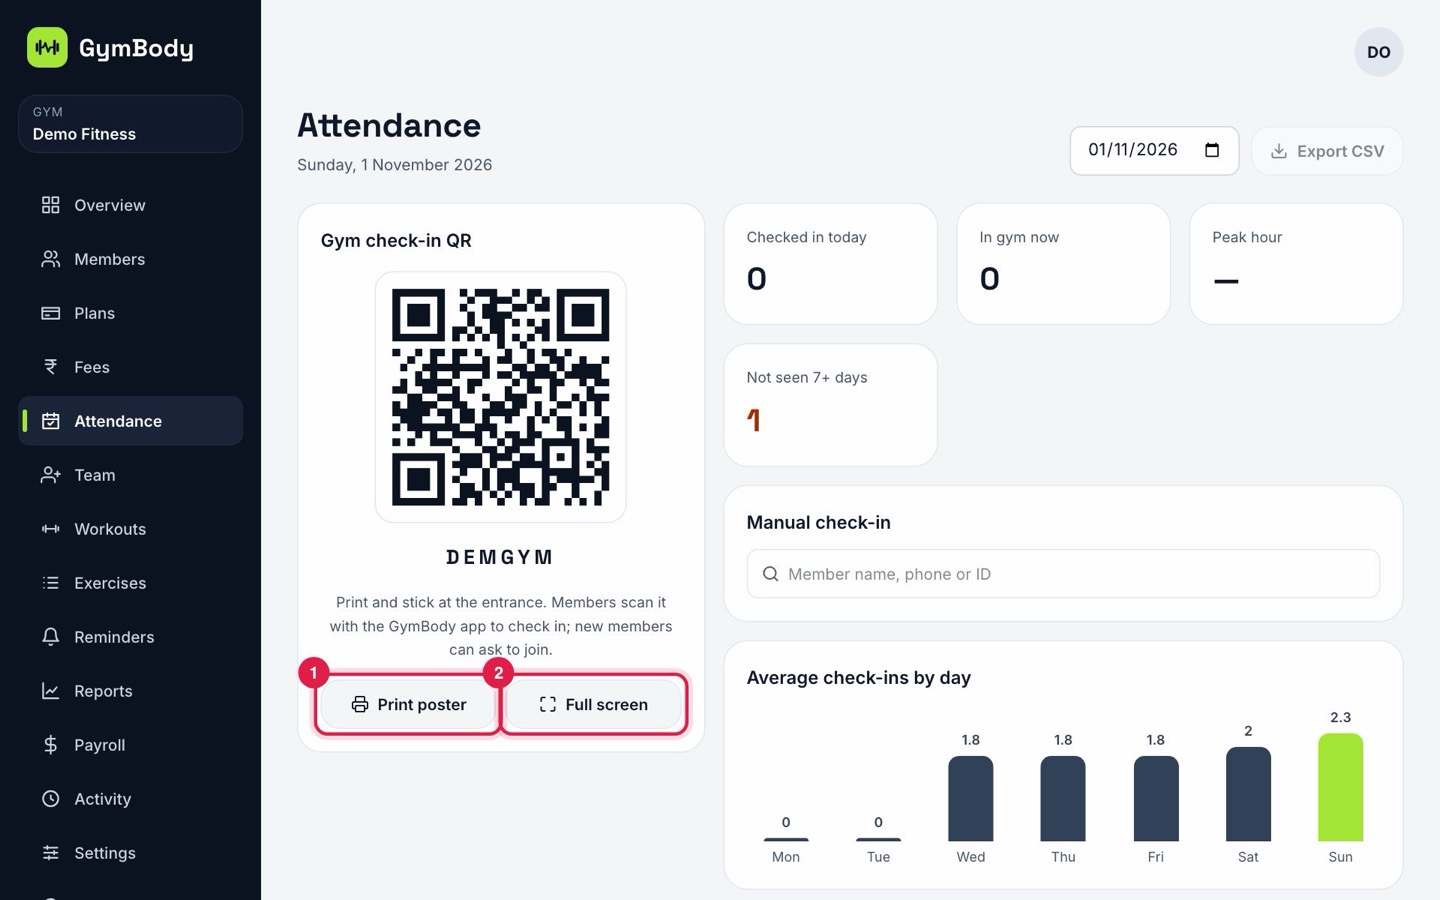
Members check in by scanning your gym's QR code with the GymBody app. Staff can also mark people by hand.

The attendance page with Print poster and Full screen marked

Steps

  1. 1Click “Print poster” 1 and stick the QR poster at your entrance.
  2. 2Or click “Full screen” 2 to show the QR on a tablet or TV at the desk.
  3. 3To check someone in by hand, search their name under “Manual check-in”.

Good to know

  • The code under the QR is also the join code: new members can enter it in the app to ask to join your gym.

Team

Add your team

For:Owner

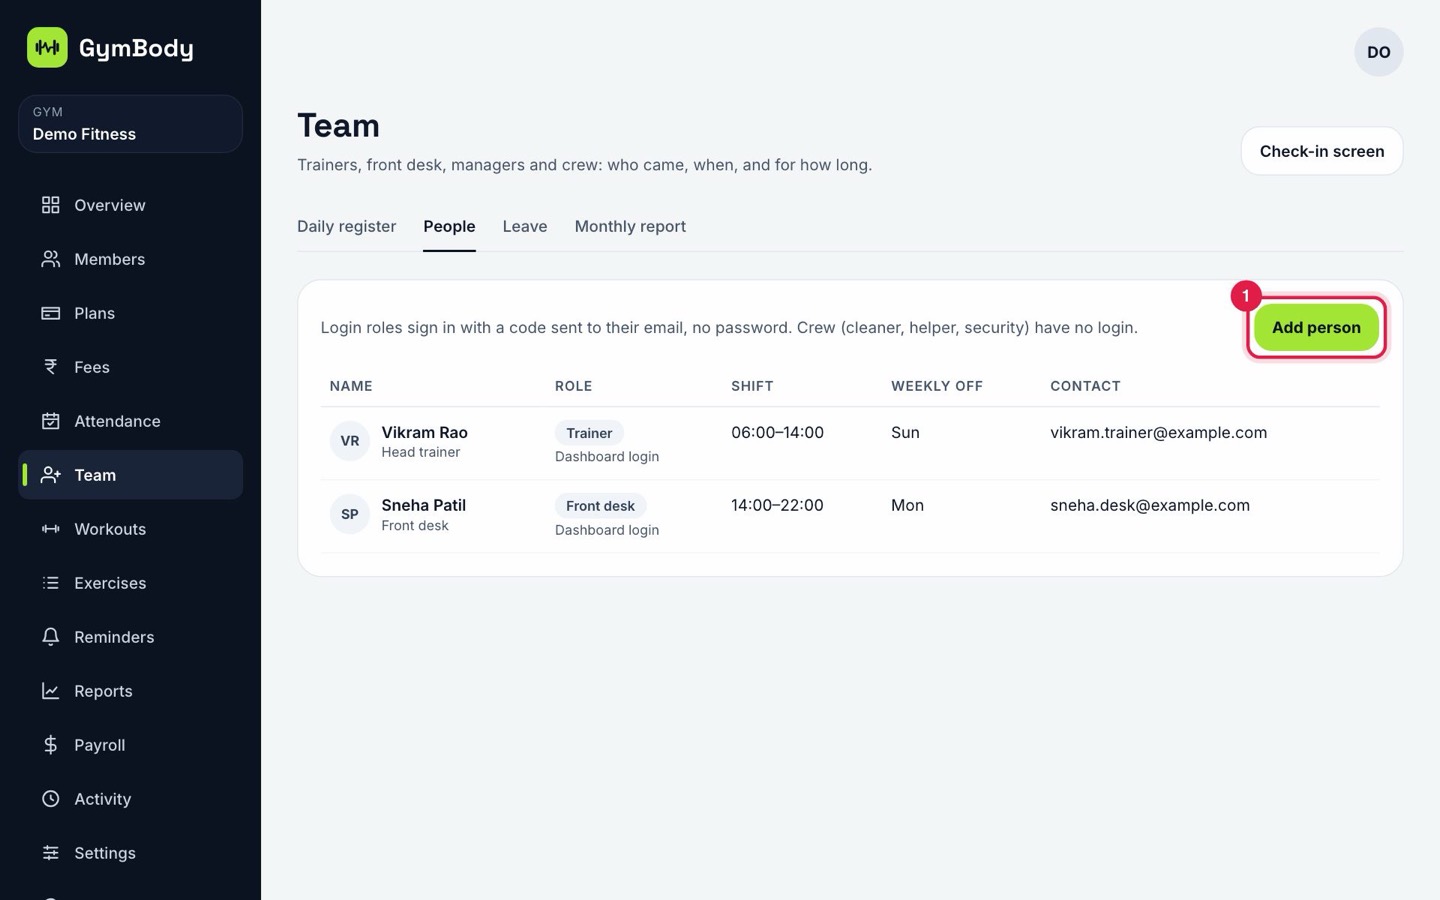
Add trainers, front desk, managers and crew. Each person with a login gets their own account; nobody shares the owner's login.

The team's People tab with Add person marked

Steps

  1. 1Open “Team”, go to the “People” tab and click “Add person” 1.
  2. 2Enter the name, role (Trainer, Front desk, Manager or Crew), email, shift times and weekly off.
  3. 3They log in at getgymbody.com/login with that email and a code. Crew (cleaners, helpers, security) have no login.

Good to know

  • Control what each role can do in Settings → Staff and roles.

Staff attendance and leave

For:OwnerFront desk

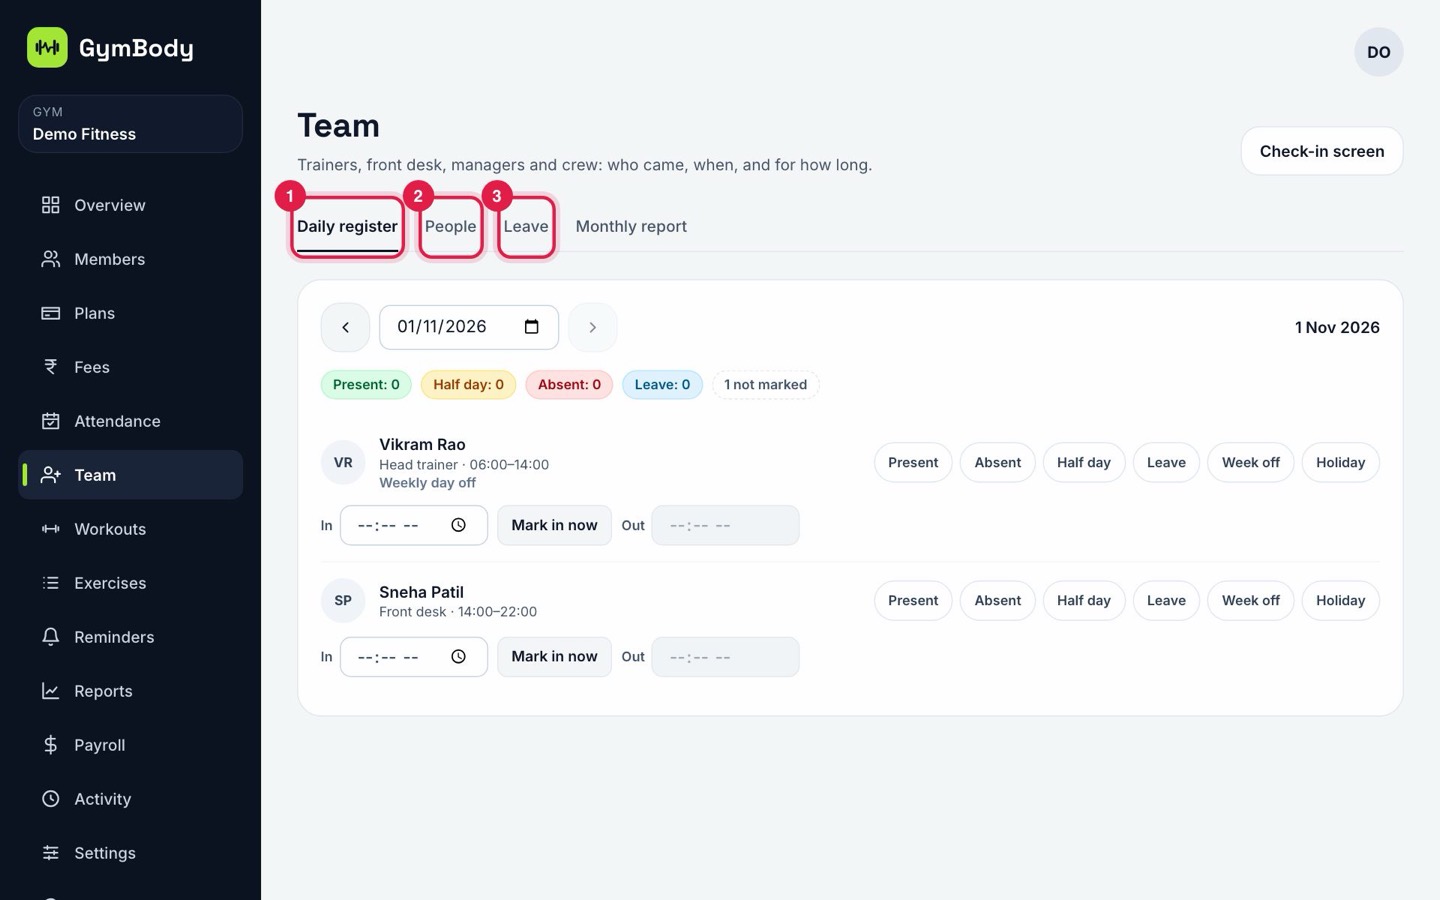
Keep a daily register of who came, late marks and leave, which payroll uses for salaries.

The team register with its tabs marked

Steps

  1. 1“Daily register” 1: mark each person Present, Absent, Half day, Leave or Week off, and their in and out times.
  2. 2“People” 2: your team list.
  3. 3“Leave” 3: approve or reject leave requests and add gym holidays.

Good to know

  • “Check-in screen” at the top turns a tablet into a staff check-in kiosk with a daily code.

Salaries and payslips

For:Owner

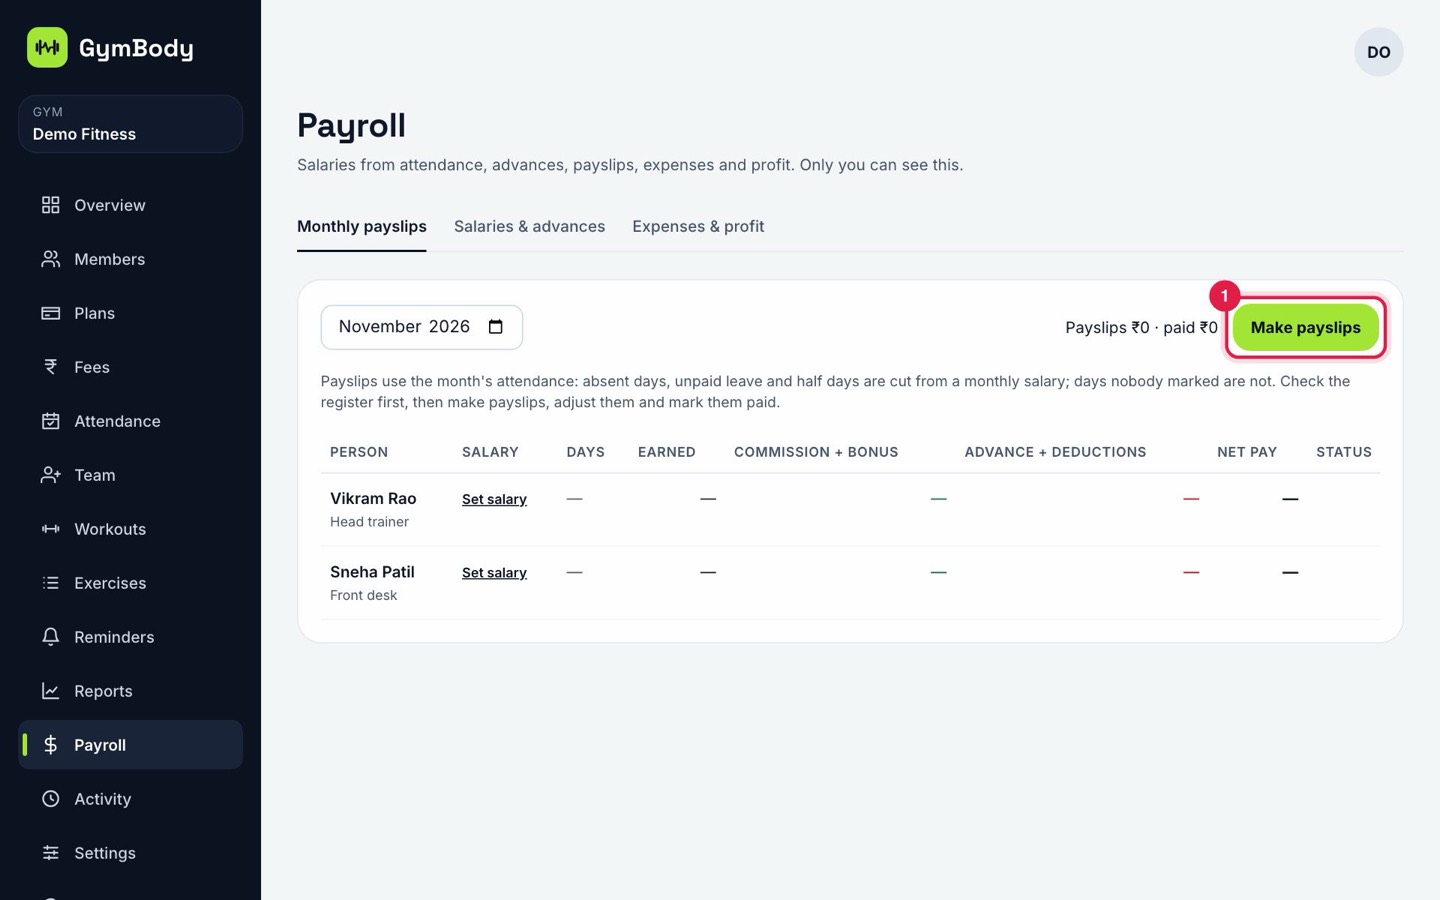
Payroll works out salaries from the attendance register, advances and trainers' commission.

The payroll page with Make payslips marked

Steps

  1. 1In “Salaries & advances”, set each person's monthly salary.
  2. 2At the end of the month, check the register, then click “Make payslips” 1.
  3. 3Adjust a payslip if needed and mark it paid.

Good to know

  • Only the owner can see Payroll.

Training

Workout plans

For:OwnerTrainer

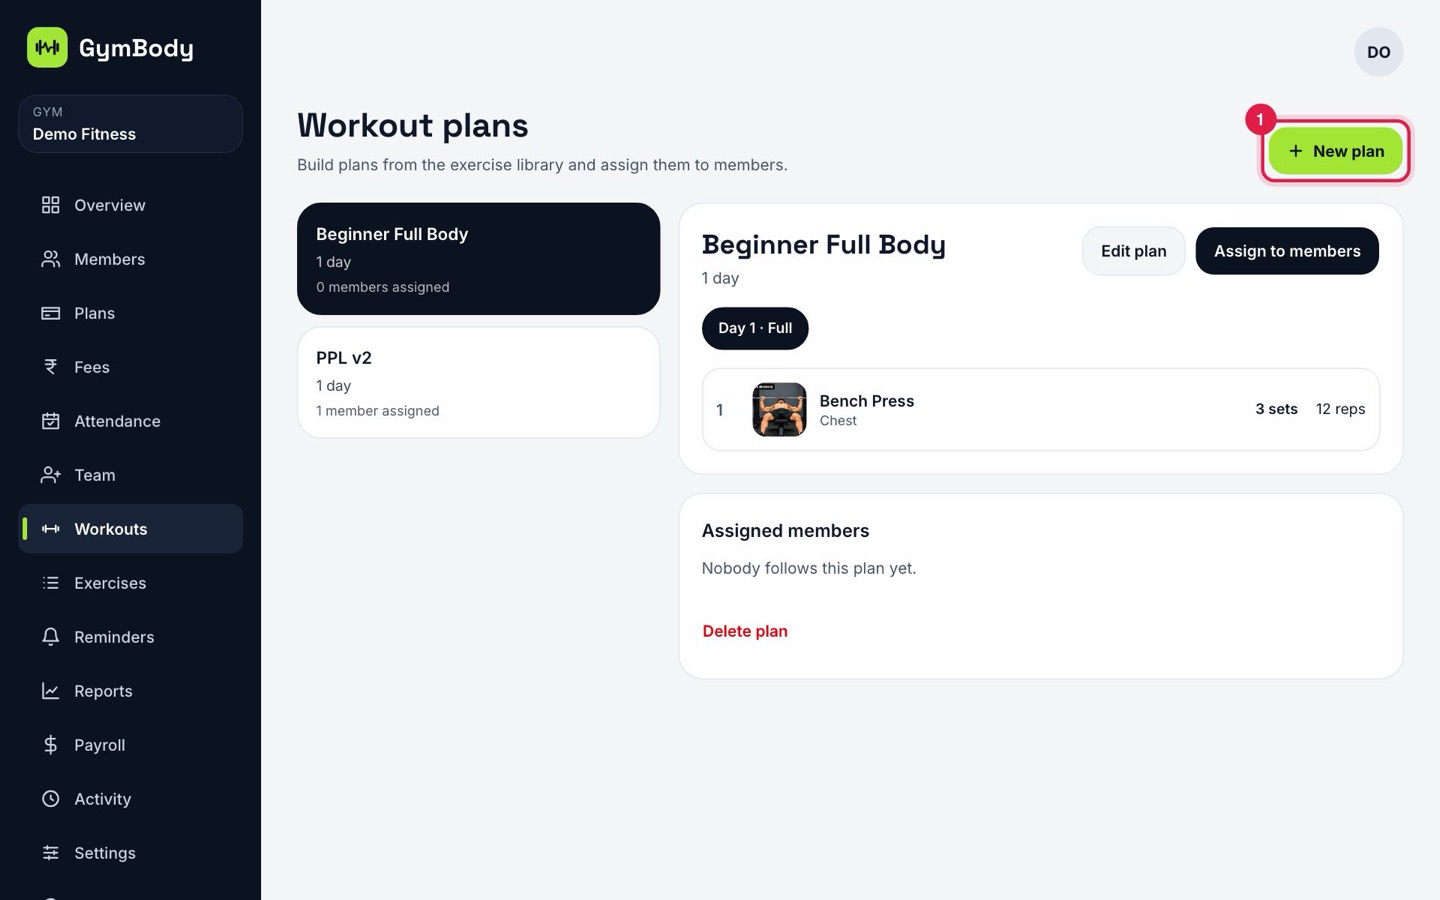
Build workout plans from the exercise library (133 exercises with pictures) and assign them to members, who see them in the app.

The workout plans page with New plan marked

Steps

  1. 1Open “Workouts” and click “New plan” 1.
  2. 2Add days, then add exercises with sets, reps and rest.
  3. 3Open a plan and click “Assign to members” to give it to one or more members.

Good to know

  • Add your own exercises under “Exercises” if something is missing from the library.

Personal training

For:OwnerFront deskTrainer

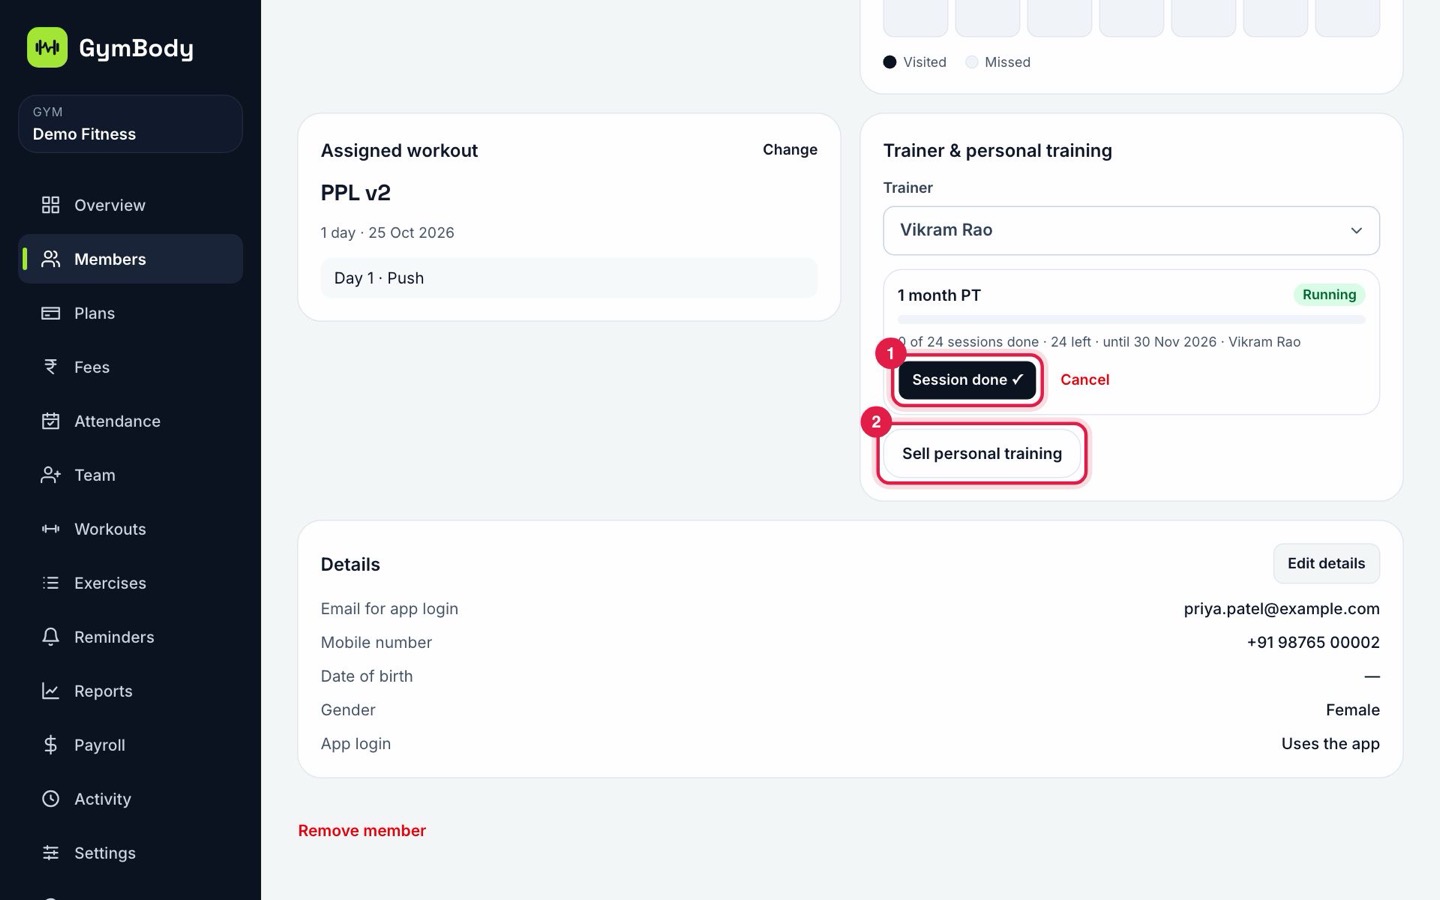
Sell personal training packages and let trainers earn a commission for every session they mark done.

A member's personal training card with Session done and Sell personal training marked

Steps

  1. 1Create a package once in “Plans” → “Personal training packages”: sessions, price, valid days and the trainer's percentage.
  2. 2On the member's profile, choose their trainer and click “Sell personal training” 2.
  3. 3After each session, the trainer (or you) clicks “Session done ✓” 1. The commission is added to the trainer's salary.

Good to know

  • The card shows sessions done, sessions left and the end date.

Your business

Reports

For:Owner

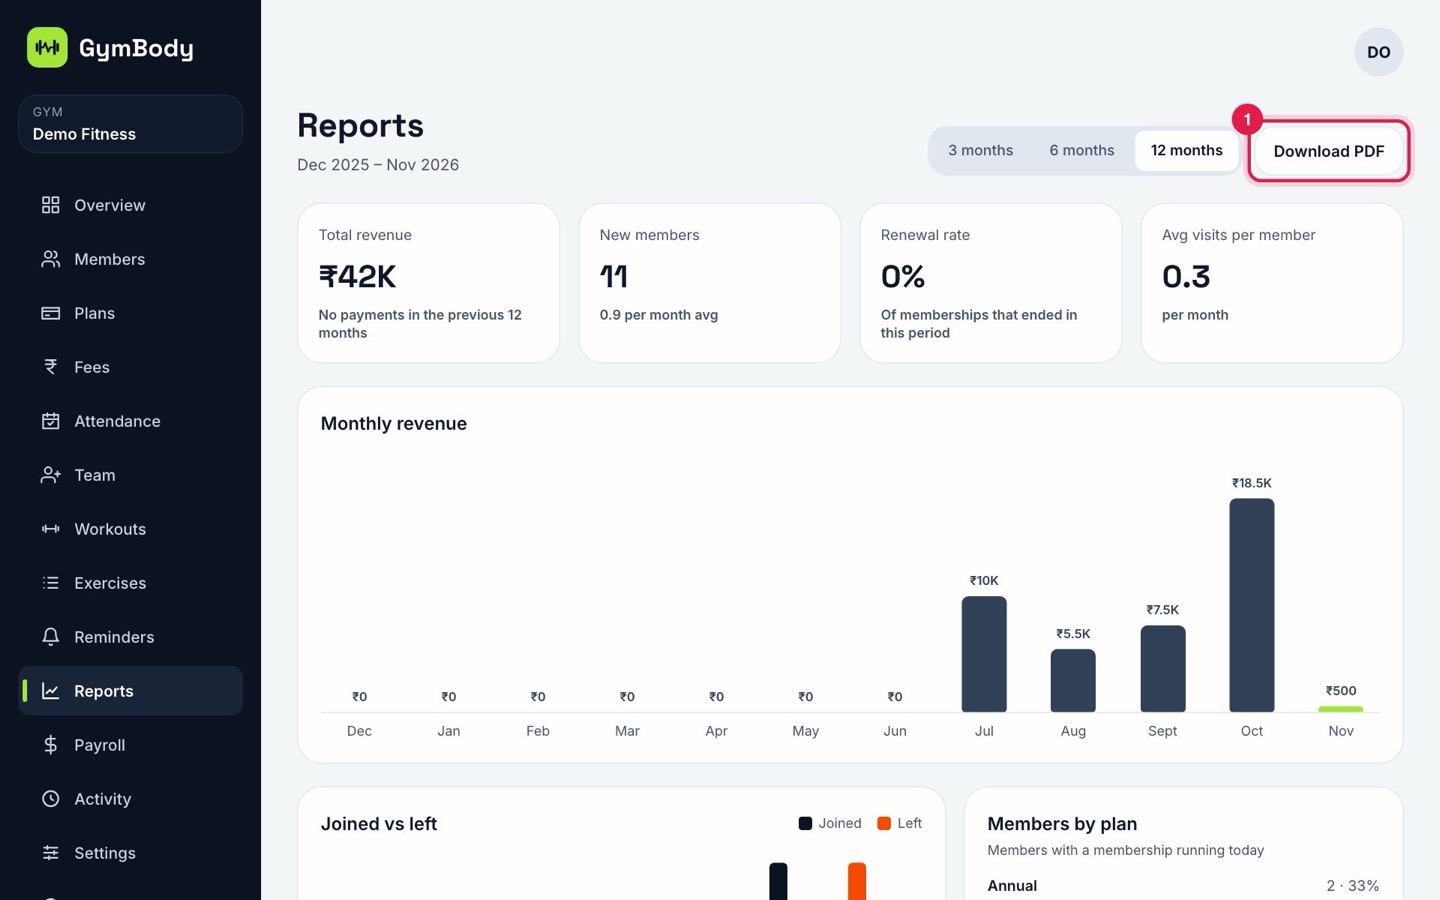
See revenue by month, new members, renewals, visits and members by plan for the last 3, 6 or 12 months.

The reports page with Download PDF marked

Steps

  1. 1Pick the period at the top.
  2. 2Click “Download PDF” 1 for a copy to keep or share.

Good to know

  • “Activity” in the menu shows who did what in your gym, and cannot be changed.

Your GymBody plan

For:Owner

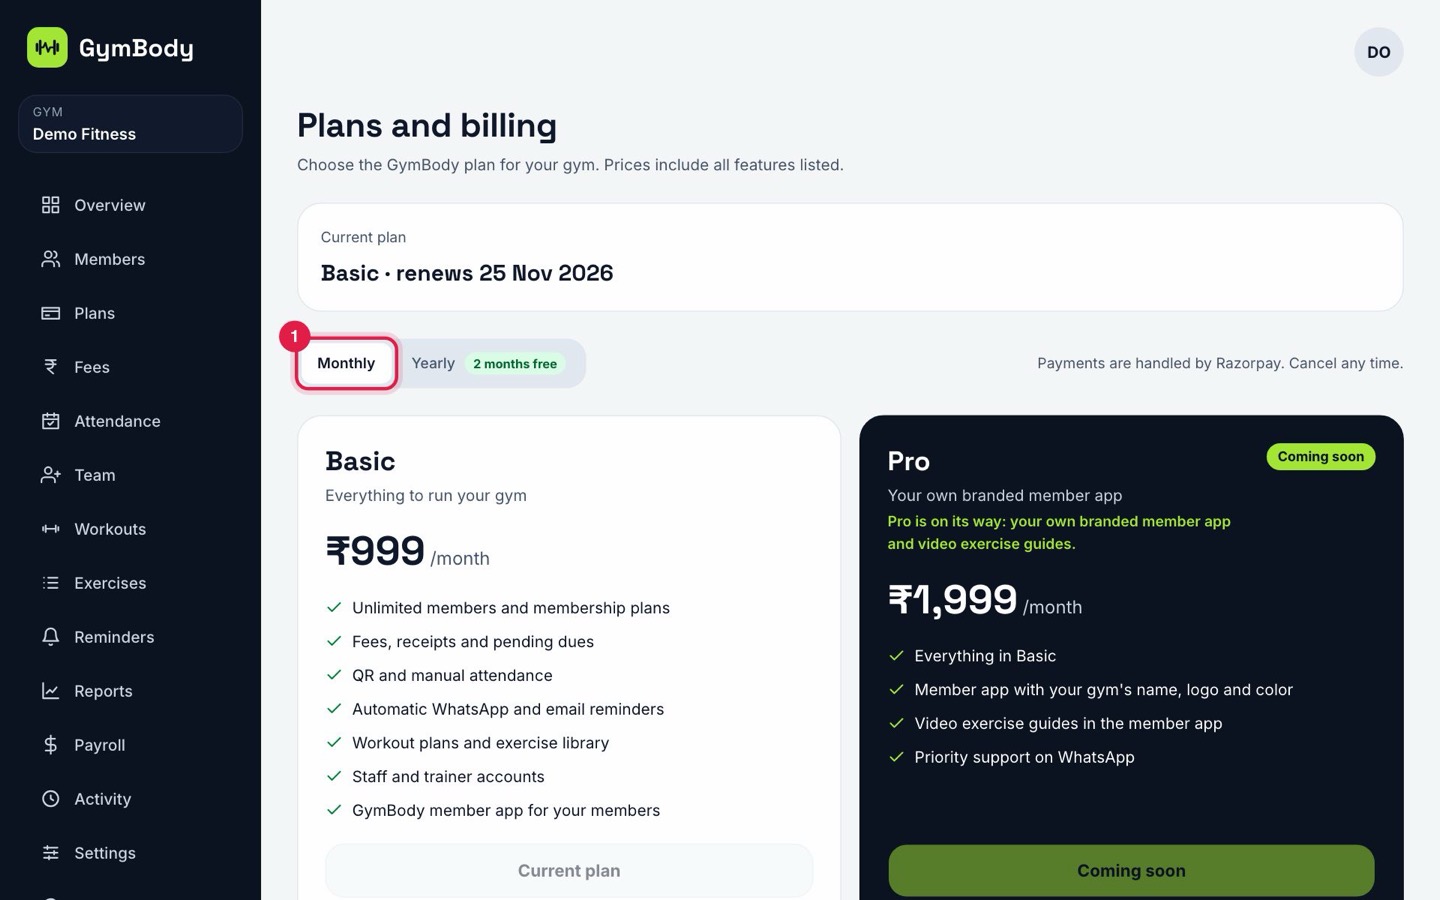
After the 14-day trial, pick a plan to keep using GymBody. You pay securely by UPI, card or net banking through Razorpay.

The billing page with the Monthly and Yearly switch marked

Steps

  1. 1Open “Settings” → “Billing”, choose Monthly or Yearly 1 and click the plan's button.
  2. 2Pay in the Razorpay window. Your plan turns active at once.
  3. 3Cancel any time from the same page: the plan keeps working until the end of the paid period.

Good to know

  • Payments are not refunded when you cancel. See our refund policy for details.

Settings

For:Owner

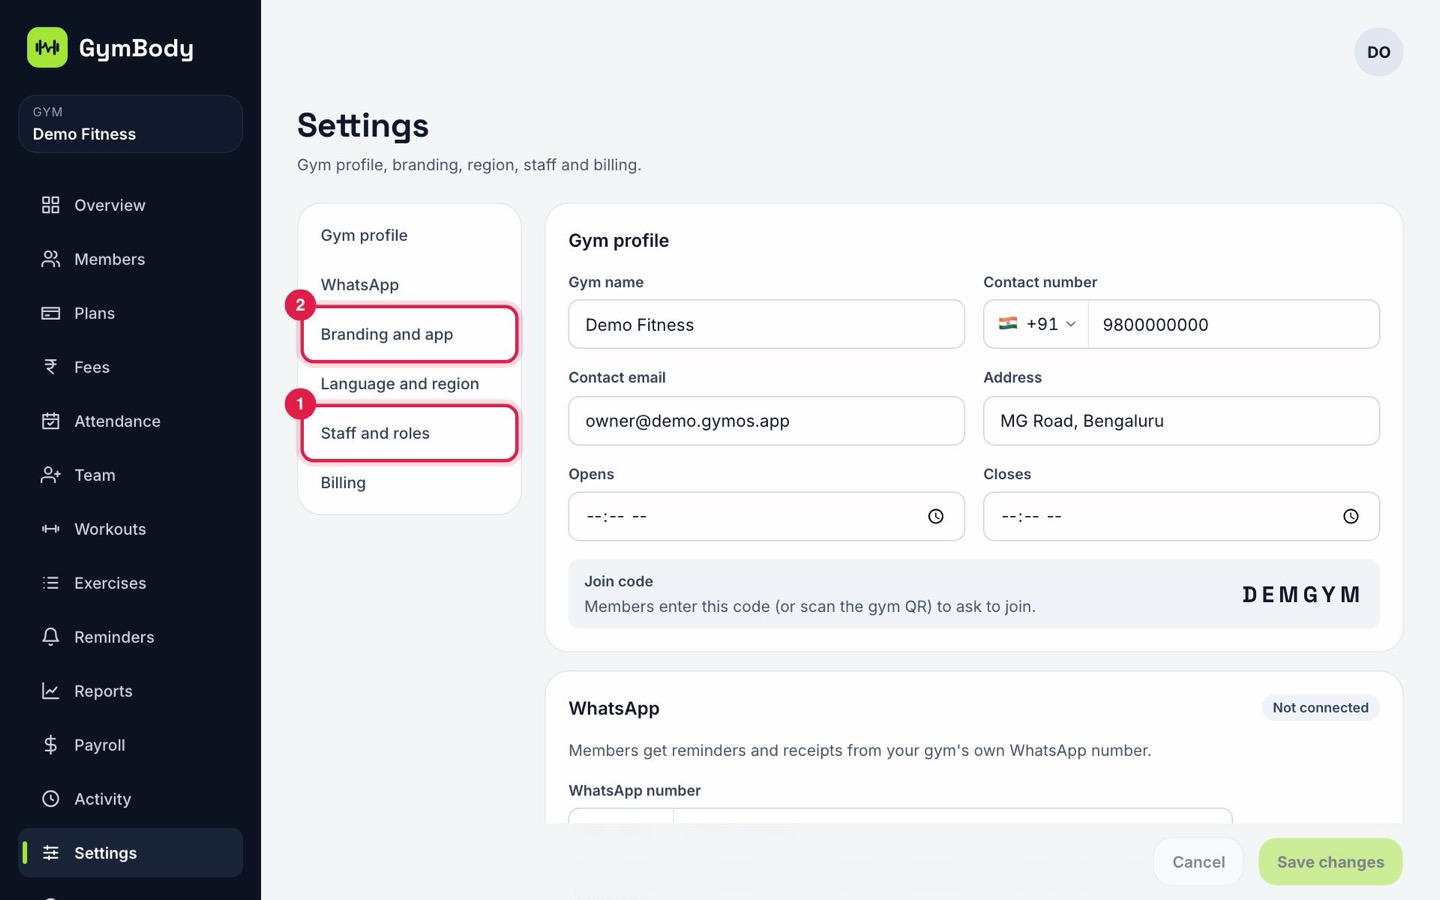
Your gym's details, branding, region and who can do what.

The settings page with Staff and roles and Branding and app marked

Steps

  1. 1“Staff and roles” 1: choose what front desk, managers and trainers are allowed to do.
  2. 2“Branding and app” 2: add your logo and colour for receipts and the member app.
  3. 3“Gym profile”: name, contact, address and opening hours.

For trainers

A trainer's day

For:Trainer

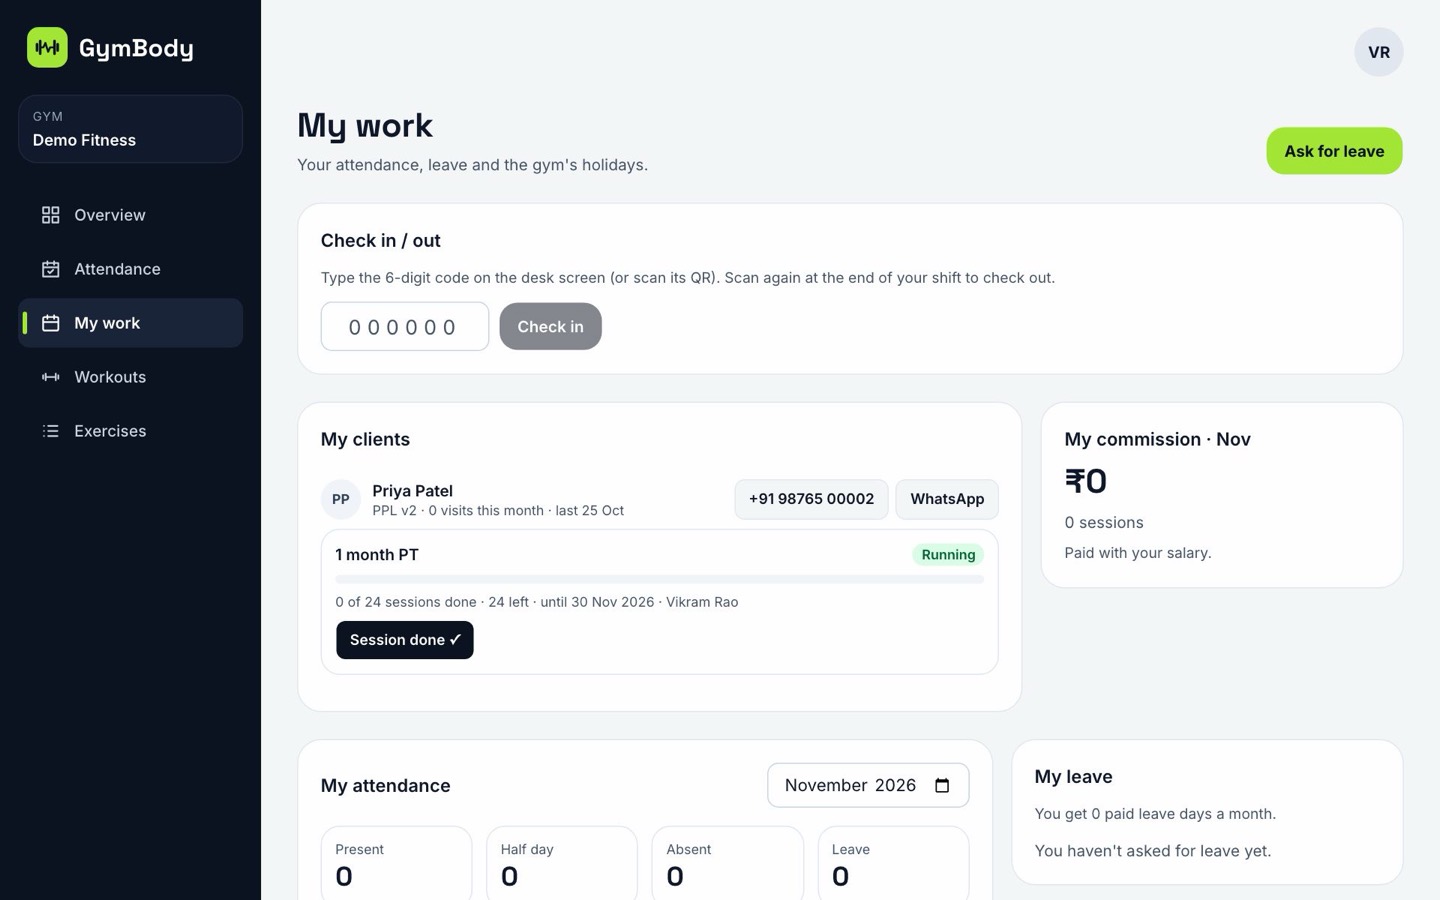
Trainers log in at getgymbody.com/login with the email the owner added. “My work” has everything for the day.

The trainer's My work page

Steps

  1. 1Check in: type the 6-digit code shown on the gym's check-in screen and click “Check in”. Do the same to check out.
  2. 2My clients: the members assigned to you, their visits and personal training.
  3. 3Click “Session done ✓” after each personal training session to earn your commission.
  4. 4Use “Ask for leave” to request leave; the owner approves it.

Good to know

  • Your commission for the month shows on the right and is paid with your salary.

Help

Get help from GymBody

For:OwnerFront deskTrainer

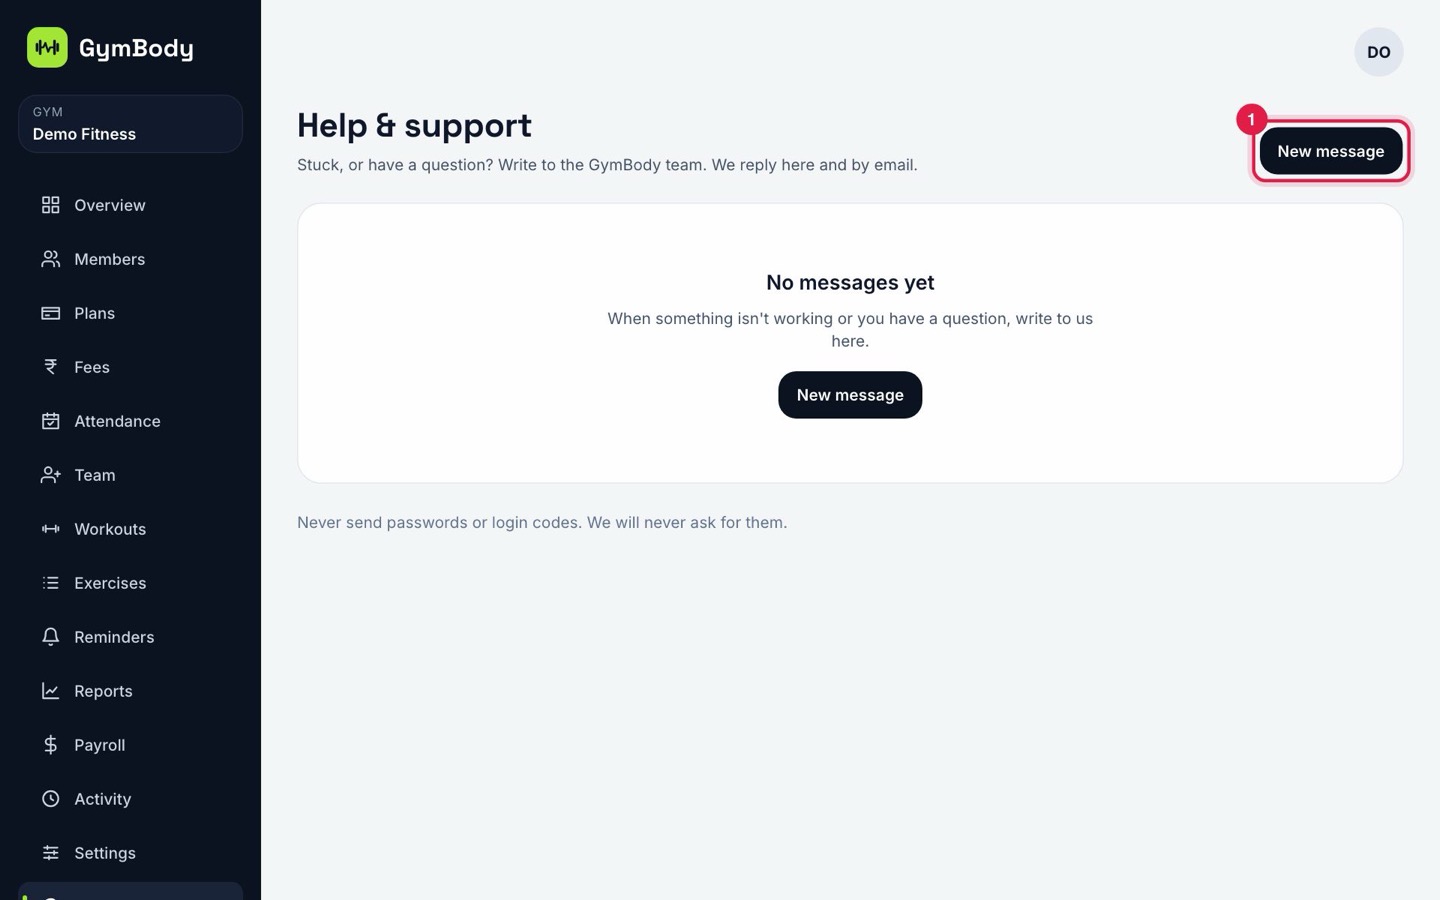
Stuck or have a question? Write to the GymBody team from your dashboard.

The help and support page with New message marked

Steps

  1. 1Open “Help & support” from the menu and click “New message” 1.
  2. 2Describe what happened and add a screenshot if you can. We reply here and by email.

Good to know

  • Never send passwords or login codes. We will never ask for them.

Still stuck?

Open Help & support in your dashboard, or write to support@getgymbody.com. We usually reply within one working day.

Contact supportsupport@getgymbody.com